Think you can make better games than all of the crap you see on the app store? If so, maybe its your time to learn how to make video games that run on your iPhone. If you make a good enough game, I'll post it on this site in a new section called "Reader's Apps". Better yet, let me help you get started.
Game programing is vastly different depending on which system you want to design for, while playstation and xbox tend to use the C++ language, iPhone development uses a different language called Objective-C. Both languages are similar in design but vastly different in syntax. When I started out at age 15 trying to learn to make video games, I was extremely annoyed with how many tutorials and examples there were on the programming languages but not games. Most tutorials covered only the raw basics like printing out "records" and "calculations", but offered nothing for making games or drawing content on a screen. So thats exactly what this is. I won't go into detail on C, C++ or Objective-C here because it would take forever and take away from the game development aspect. While you can follow this tutorial without learning to program I do still recommend that if not already, you learn the basics of how to program in C++ and Objective-C before, during, or after reading this tutorial.
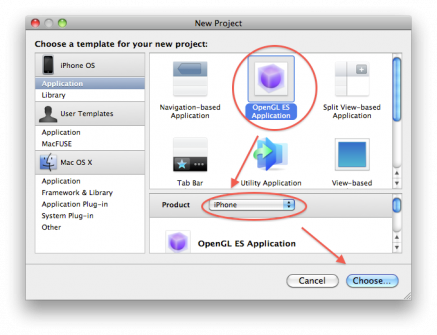
To get started with Objective-C on the iPhone, lets dive in to new project that uses OpenGL ES. Even though it is harder at first, using OpenGL allows us to make the jump from 2D to 3D games later on when we are ready. If you don't already have it, you'll need to download the latest Xcode from apple. Once you're ready, open up Xcode and start a new OpenGL ES project like so
Game programing is vastly different depending on which system you want to design for, while playstation and xbox tend to use the C++ language, iPhone development uses a different language called Objective-C. Both languages are similar in design but vastly different in syntax. When I started out at age 15 trying to learn to make video games, I was extremely annoyed with how many tutorials and examples there were on the programming languages but not games. Most tutorials covered only the raw basics like printing out "records" and "calculations", but offered nothing for making games or drawing content on a screen. So thats exactly what this is. I won't go into detail on C, C++ or Objective-C here because it would take forever and take away from the game development aspect. While you can follow this tutorial without learning to program I do still recommend that if not already, you learn the basics of how to program in C++ and Objective-C before, during, or after reading this tutorial.
To get started with Objective-C on the iPhone, lets dive in to new project that uses OpenGL ES. Even though it is harder at first, using OpenGL allows us to make the jump from 2D to 3D games later on when we are ready. If you don't already have it, you'll need to download the latest Xcode from apple. Once you're ready, open up Xcode and start a new OpenGL ES project like so
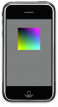
Once the project appears, click the "build and run" icon. You'll see something quite boring. The default OpenGL ES project shows a bouncing square that goes up and down. We're going to get rid of the stupid square and replace it with our own code. Before we do that, we're going to make things easier on ourselves, because we don't need to do any advanced stuff that requires OpenGL ES version 2.0, we're going to disable it. Find the file called EAGLView.m and open it up.
Find the section of code that looks like
    renderer = [[ES2Renderer alloc] init];

    if (!renderer)
    {
      renderer = [[ES1Renderer alloc] init];

      if (!renderer)
      {
        [self release];
        return nil;
      }
    }
And change it so that it reads
    renderer = nil;

    if (!renderer)
    {
      renderer = [[ES1Renderer alloc] init];

      if (!renderer)
      {
        [self release];
        return nil;
      }
    }
This makes it so that the app will use OpenGL ES version 1 no matter what even if it could have used OpenGL ES 2.0 on newer phones. This is helpful because supporting OpenGL ES 2.0 requires us to write all of our drawing code twice (once for version 1 and again for version 2), and that is a giant pain. Click build to make sure the change worked and there's no errors.
Next step, open up ES1Renderer.m and find your way to the render function.
Next step, open up ES1Renderer.m and find your way to the render function.
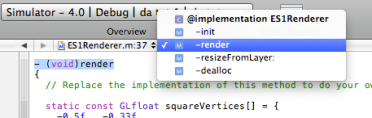
All the code that needs to be ran to draw the screen is located between the two curly braces of the render function. What we change here will determine how the screen looks in the game. Take a look at the vertex definition code a little more closely
  static const GLfloat squareVertices[] = {
    -0.5f,  -0.33f,         //X, Y  point 1
    0.5f,  -0.33f,          //X, Y  point 2
    -0.5f,   0.33f,         //X, Y  point 3
    0.5f,   0.33f,          //X, Y  point 4
  };

  static const GLubyte squareColors[] = {
    255, 255,   0, 255,    // red, green, blue, alpha (opacity) point 1.. etc
    0,   255, 255, 255,
    0,     0,   0,   0,
    255,   0, 255, 255,
  };
My added comments show how the given points are used by OpenGL to draw a square-shaped polygon. Actually, the square polygon is made up of two triangles. The squareVertices array holds the coordinates for each corner, while the squareColors array holds the colors for each point which are blended together. Just about anything you can draw in OpenGL is constructed from polygons. Entire 2D games can be made in OpenGL using nothing but these square polygons (often called quads) and thats exactly what we're doing to do. Let's make a blended blue sky background. To do this, we need to do three things, edit the coordinate array, edit the color array, and stop the square from moving. Editing your render routine to look like mine below will accomplish this.
- (void)render
{
  static const GLfloat squareVertices[] = {
    0,  0,                 //new coordinates
    640, 0,
    0,  480,
    640, 480,

  };

  static const GLubyte squareColors[] = {
    0, 0, 255, 255,        //black fading to blue
    0, 0, 255, 255,
    0, 0, 0, 255,
    0, 0, 0, 255,
  };

  glViewport(0, 0, backingWidth, backingHeight);

  glMatrixMode(GL_PROJECTION);
  glLoadIdentity();
  //this makes the coordinates easier to work with
  glOrthof(0, 320, 0, 480, -1, 1);
  glMatrixMode(GL_MODELVIEW);
  glLoadIdentity();

  //no more motion (commented out)
  //glTranslatef(0.0f, (GLfloat)(sinf(transY)/2.0f), 0.0f);

  glClearColor(0.5f, 0.5f, 0.5f, 1.0f);
  glClear(GL_COLOR_BUFFER_BIT);

  glVertexPointer(2, GL_FLOAT, 0, squareVertices);
  glEnableClientState(GL_VERTEX_ARRAY);
  glColorPointer(4, GL_UNSIGNED_BYTE, 0, squareColors);
  glEnableClientState(GL_COLOR_ARRAY);

  glDrawArrays(GL_TRIANGLE_STRIP, 0, 4);

  [context presentRenderbuffer:GL_RENDERBUFFER_OES];
}
Running this code should give us a non moving cool blue faded background. You may notice that I added the glOrtho2f function. When the matrix mode is set to GL_PROJECTION, functions like glOrtho2f allow me to change the coordinate system that is used by OpenGL. This particular routine defines a 2D coordinate system as follows.
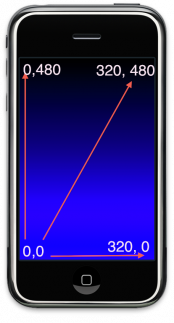
Typical 2D OpenGL coordinate system
Ideally we would like to re-use the square over and over again. So lets make it a little more flexible. Just in the empty space above render, we're going to create a C function called draw_square which will take care of the dirty work of drawing a square for us. Once the routine is written, we never have to write this ugly code again. I'm using C syntax because it is easier to work with for beginners. Place the following routine just above (not inside) the render method.
void draw_square(int x, int y, int w, int h)
{
  const GLfloat sv[] =
  {
    x,  y,
    x+w, y,
    x, y+h,
    x+w, y+h,
  };

  glVertexPointer(2, GL_FLOAT, 0, sv);
  glEnableClientState(GL_VERTEX_ARRAY);
  glDisableClientState(GL_COLOR_ARRAY);
  glDrawArrays(GL_TRIANGLE_STRIP, 0, 4);
}
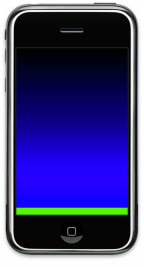
Now, we can call upon draw_square whenever we want to draw a square. So lets use it inside the render function to draw a ground the objects in our world. Simple enough. Add the following code just before the last line in render.
  //...
  glDrawArrays(GL_TRIANGLE_STRIP, 0, 4);


  //more drawing (game objects)
  glColor4ub(0, 200, 0, 0);

  //draw the ground
  draw_square(0, 0, 320, 20);

  //put back default white color
  glColor4ub(255, 255, 255, 255);


  [context presentRenderbuffer:GL_RENDERBUFFER_OES];
  //...
The screen should now look something out of a glitching 8-bit nintendo game. But the potential is there for much more. Next time we'll add images via texturing to create a little hero dude that we can control with tapping events. In the meantime feel free to add a bunch of squares to see how the coordinate system works.
 RSS Feed